This travel-themed piñata is sure to be a hit at your next party!
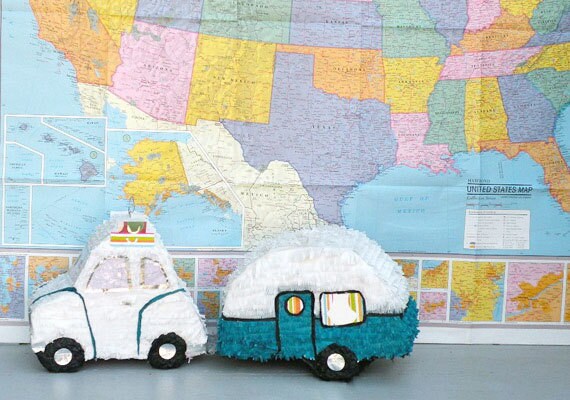

I’m Aracely, owner and piñatera for Whack Piñatas. I think it was Thomas Jefferson who first said, “Life would be a million times better if there were piñatas strategically placed throughout the day.” (Or maybe it was a William Shatner tweet.) Whoever it was, they were right! Piñatas are a great time and surprisingly easy to make, so reach into the recycling bin and prepare to turn your next craft party into a craft fiesta! In this tutorial, you'll learn how to make a camper, but you can use the same technique to make anything you’d like, including a little car. You Will Need:
- Cardboard
- Ruler or straight edge
- Strong scissors and/or box cutter
- Stapler
- Wire or rope
- Masking tape or duct tape
- Newspaper
- Mixing bowls
- Glue and water
- Decorative paper (tissue paper, card stock, scrapbooking paper, crepe paper)
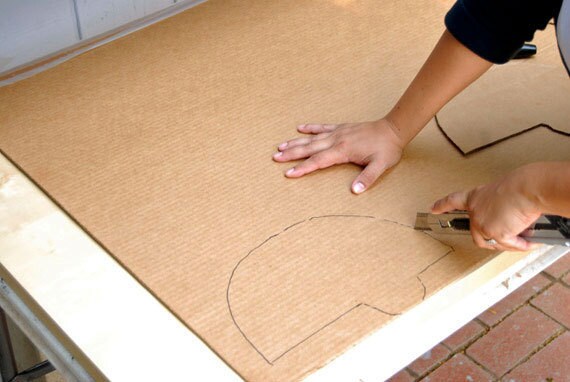
Creating the form: Draw and cut your desired shape on the cardboard. Use the first cut-out as the template for the second wall of your piñata. Match them up to make sure that the two pieces are cut to the same size.
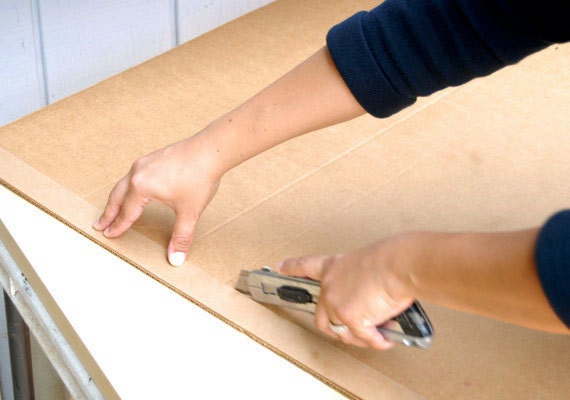
Cutting strips: Using a ruler or a straight edge, cut long strips of cardboard about an inch wide, and as long as your cardboard will allow. The amount of strips you’ll need will vary depending on the size of your piñata. Cut 4-5 to start. If you need more, you can always go back and make more.
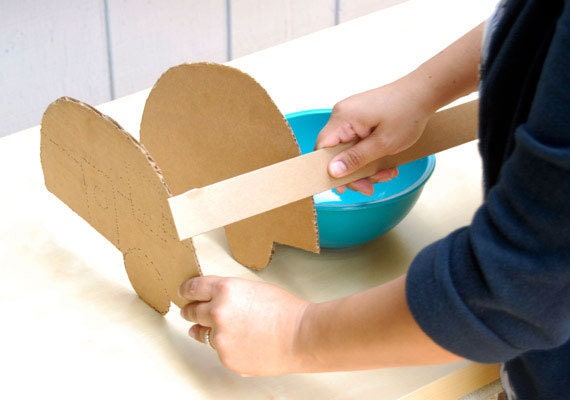

Determining the width of your piñata: Align the two cut-outs and determine the desired width. Mark the width on one of the strips, then add 2 inches and cut. Cut several more strips to the same length as the first. You’ll be using these strips to attach the walls to one another, so make sure they are all the same length or your piñata will be uneven.

Attaching the walls: Using a ruler or one of the strips as your guide, fold the ends of the cut strips.


Align the two walls and begin attaching them to one another by stapling the folded ends of the strips to both walls. Again, the amount of strips you use will vary depending on the size of your piñata.

Tip: There’s nothing more frustrating than a piñata that won’t break. If you’re making a piñata for a younger bunch, you may want to weaken it by poking the solid walls with your box cutter and using fewer strips to attach the walls together.

Making and attaching the hanger: Take the wire or a rope and twist or tie a loop. Thread the ends of the wire or rope through a strip of cardboard and lace it through a couple of times on each side. Secure the end with a strong tape, like masking or duct tape.

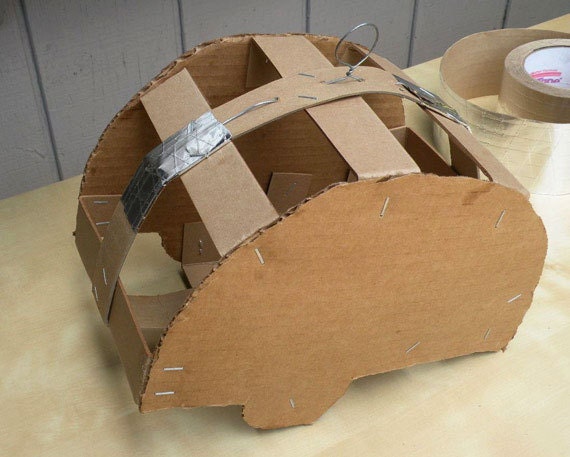
Use the stapler to attach the completed hanger to the piñata.

Papier-mâché: Use equal parts glue and water to create a papier-mâché paste. Coat your newspaper strips with the glue mixture and begin to cover the piñata. Add as many as 5 layers of paper, depending on how strong you’d like it to be. I like to finish the piñata with a solid paper so the newsprint won’t show. Allow to dry completely before decorating.

 Decorating: Before you begin decorating, remember to cut a small opening near the top of the piñata for filling. I also cut the tow hitch out of cardboard and secured it to the piñata with masking tape. You can use paint or any assortment of decorative papers to finish your piñata. If you opt for the traditional fringed paper covering, remember to work from the bottom up. Allow the piñata to dry completely before filling and hanging.
 Y ahora, dalé dalé dalé!
Remember to keep the crowd several feet away from the person who is hitting the piñata. If you don't have the heart to break your masterpiece, protect it from fading by adding a light coat of Mod Podge.
All photographs by Whack Piñatas.
Y ahora, dalé dalé dalé!
Remember to keep the crowd several feet away from the person who is hitting the piñata. If you don't have the heart to break your masterpiece, protect it from fading by adding a light coat of Mod Podge.
All photographs by Whack Piñatas.
If you make your own piñata, share a photo with us in the Etsy Labs Flickr group.


