Discover the artisanal craft of pencil sharpening with the man known as "the number one #2 pencil sharpener."
You might know David Rees as the political cartoonist behind the series Get Your War On, among others. Well, he has set all that aside to pursue his lofty dreams as a preeminent craftsman in the little known field of artisanal pencil sharpening. His new book is titled How To Sharpen Pencils: A Practical & Theoretical Treatise on the Artisanal Craft of Pencil Sharpening for Writers, Artists, Contractors, Flange Turners, Anglesmiths, & Civil Servants. Read on for an illuminating excerpt from the book that will guide you through using a single-blade pocket sharpener. Time to sharpen up!
Of all pencil-sharpeners, the humble single-blade pocket model is perhaps the most ubiquitous. That doesn’t mean our little friend is easy to master. On the contrary, its unassuming appearance gives no hint of the potential frustrations, pitfalls, brambles, dead-ends, and heartbreaks that lie within.
I approach every use of a pocket sharpener with guarded optimism. As far as I’m concerned, it offers the most intimate encounter with a pencil. It’s my favorite sharpening technique precisely because, like all intimate encounters, its ideal outcome is so obvious yet its practical application is so fraught with peril.

Equipment Checklist: Emery board Toothpick Magnifying lenses Tweezers Bag Single-blade pocket sharpener Pencil (not pictured)
Step One: Inspecting and Cleaning the Sharpener Before beginning the sharpening process, do a quick visual inspection of the sharpener. The casing should be free of cracks and blemishes. The blade should be properly aligned relative to the body of the sharpener and free of rust, blood, or other elements that could compromise the blade’s motion across the surface of the pencil.

If wood shavings or graphite residue from previous use are lodged against the blade, remove them by gently inserting a wooden toothpick between the blade and the opposite plane. Pull the toothpick towards the sharpener’s entrance hole, collecting debris as you go.
Step Two: Placing the Tool in Hand

Hold the sharpener in your non-dominant hand so as to stabilize it during the sharpening process. The blade should be face-up and visible throughout the process, as you will be monitoring its contact with the pencil as well as the unfurling of shavings.
Hold the pencil in your dominant hand. You will be rotating the pencil, not the sharpener. The sharpener should remain stationary throughout the process, barring extreme circumstances.
Step Three: Engagement Begin rotating the pencil inside the body of the sharpener so the blade is engaging with the shaft of the pencil. For left-handers, this means a clockwise rotation. Maintain steady, moderate pressure along the shaft as you guide it towards the forward end of the sharpener.
Step Four: Monitoring the Shavings' Egress

Many of my clients request the use of a single-blade hand sharpener because of the iconic, scalloped ribbon of shavings it produces. (Sometimes called “the apple-peel effect" or "M'lady's ruffled skirt abandoned on the floor in the throes of our love-making.”)
 Although you may be tempted to focus exclusively on the pencil point, attention must be paid to the merry byproduct of your labor.
As pencil shavings begin to curl out of the sharpener, turn the sharpener away from you so the shavings fall to the side and don’t obscure the blade. Do not allow the shavings to collect in your palm. Shavings should unfurl completely, lest they jam the sharpener.

If shavings are reluctant to leave the sharpener’s planar orifice, a gentle tug will release them from its grasp. Place them on a flat surface and return to the task at hand.
Step Five: Checking In With Your Pencil

After some time you should notice the pencil point beginning to take shape and feel the sharpener engaging the newly exposed graphite, which will offer less resistance than the wood. (See Table 5.1.) This typically happens after thirteen to fifteen rotations. Now is the time to pay especially close attention to your pencil’s progress. You may be tempted to remove the pencil and test its point after one or two further rotations. Resist the temptation a bit longer — approximately two more rotations, if not one additional rotation, or even a further, final rotation.
Remove the pencil and look at it.
If the pencil is still not sharp enough, engage the sharpener in one or two additional rotations. Avoid a third rotation, a.k.a. “the Devil’s Dance.”
Step Six: "A Closer Look"
Use your magnifying spectacles to search the pencil point for irregularities. In this photograph, we see a ragged edge to the collar at the site where the sharpening process was concluded. This begs for correction.


Step 7: Correcting the Collar

You can further improve the pencil by removing the raised edge where the blade last encountered the collar. Smooth the collar with an emery board, taking care not to flatten its conical surface. A light touch is key.
After smoothing the collar, clean any graphite residue with a cotton handkerchief or rag. Make sure not to damage the graphite and the tip!

Step Eight: "Bagging the Big Game"
At the end of the sharpening process, you must attend to the shavings. They are part of the pencil and, as such, should be returned to their rightful owner.

A bag of clean shavings, besides looking delightful, should put to rest any concerns your clients may have about your technique: that you used an electric sharpener instead of a hand-sharpener; that you hoard shavings for your personal use; that the “pencil” is a plastic simulacrum; that you passed the shavings through your body before returning them, etc.

Using tweezers, carefully place the shavings in a bag. Label the shavings and pencil according to your preferred indexing system.
Step Nine: Reviewing Your Handiwork This step can be emotionally wrenching, but it’s required if you hope to improve your practice. Taking a long look at your finished pencil is an opportunity for reflection and renewal. While reviewing your handiwork, ask yourself the following questions:
1. How closely does the pencil point correspond to your desired outcome?
Is it sharper or duller than you wanted? If the former is the case, review the rotations recorded for this job in your log book and try one or two fewer rotations on your next pencil; if the latter, add rotations — keeping in mind that most pocket sharpeners lack a physical bulwark against over-sharpening, thereby risking the production of an irregular “pin-tip” which may break at the slightest pressure and leave the point further compromised.
2. Is the collar-top consistent around the point and flush with the graphite?
Are there dips or scoops in the wood you didn’t intend? (These issues may have more to do with the quality of your pencil than your abilities; lesser pencils may have a loose or otherwise imperfect bond between the graphite core and the wooden shaft.)
3. Does the exposed graphite show signs of irregularity?
Are there divots associated with inconsistent pressure applied during the sharpening process? Again, an inferior pencil may be the culprit, as pencil-core production involves a delicate balance of graphite, clay, and wax — which may, in lesser models, be less than uniform throughout the core. Nevertheless, too much rotational torque during the sharpening process may gouge the graphite and leave a twisting “ghost image” of the sharpener blade.

The photo above exhibits several imperfections in a pencil point produced by a single-blade pocket sharpener. See if you can identify them, and consider how they could be reduced or eliminated in future jobs.

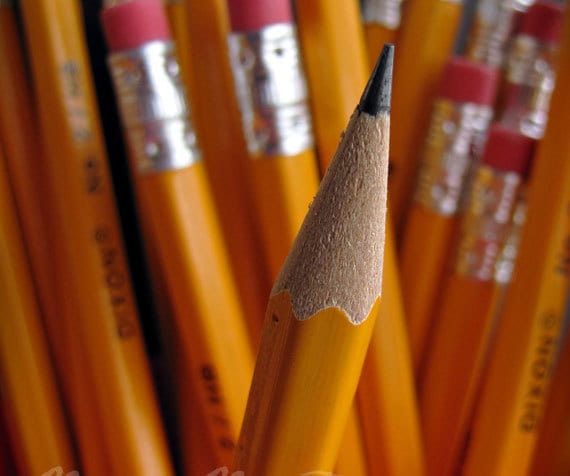
This illustration shows an ideal pencil point produced by a single-blade pocket sharpener. The collar’s height stands at 1/2 inch, roughly equal to the length of the blade less the exposed graphite. The collar-bottom runs parallel to the ferrule and eraser, perpendicular to the edges of the shaft. The collar-top is uniform and parallel to the collar bottom; there is no gap between the wood and the graphite. The point is consistent and smooth, showing no mark of the blade. The tip is solid yet sharp; there is no “pin tip” waiting to shatter.
This pencil point could be usefully employed by the general-interest user. It offers hours of stable, uniform graphite exposure for writing, arithmetic, or doodling. Highly recommended for the layperson.

Thank you to David Rees and Melville House for sharing this thorough tutorial with us. For more sage pencil sharpening advice and techniques (including novelty techniques or how to sharpen a pencil in a waterfall), check out his book, How to Sharpen Pencils, available from Melville House, or catch him live on tour.


